
Illustration by unDraw
Replace GIF with Video in Sanity + Gatsby
Replace GIF image formats and use video instead to render animations on the web while using Sanity + Gatsby
The GIF (.gif) image file format is a very old type (latest release in 1989) of animated image format that has exploded in use after a massive increase in the use of memes, online chats and forums.
Although you can create a GIF image by blending together consecutive frames of still images, most of the GIFs out there have been converted from a video format to be used on the web. Which is ironic.
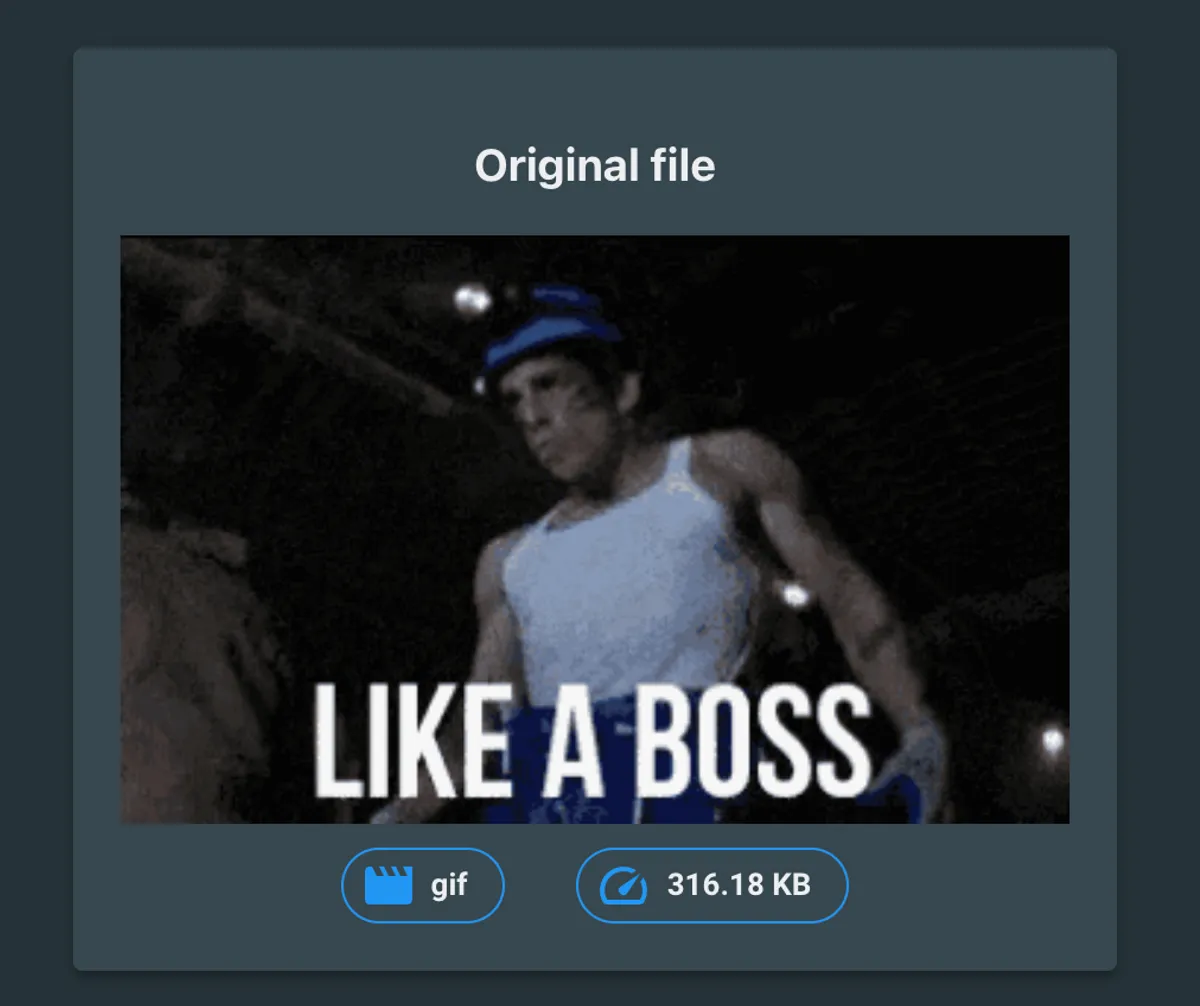
My point is that you would be better off muting that video and having it on loop and autoplay instead (more on that later), without having to convert it into a GIF. That way you would save the world a few hundreds of KBs! The difference in file size between a GIF image and a video are huge due to the compression algorithms (that I won't go into details here) and here is an example from a conversion tool I created to prove my point:
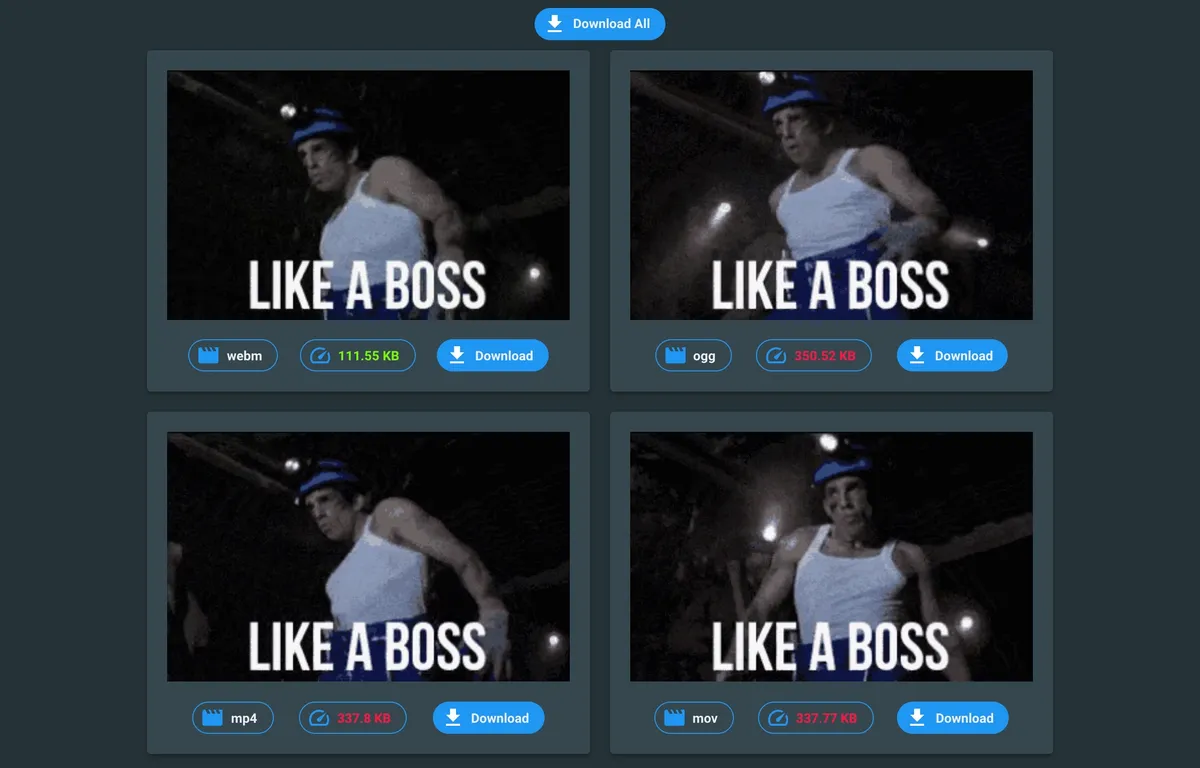
Although Sanity doesn't support converting GIF images to video format yet, it supports two types of assets currently, with a variety of file formats that you can use to render videos in the place of heavy GIF images.
Unfortunately, you won't be able to reuse your schema for images, to be able to upload both images and videos in the same component so we will be seeing later on in this article how to setup a simple schema for our video uploading components inside of Sanity studio and how to render them later on, inside of a Gatsby web app.
Limitations#
So to sum up some limitations of my approach before we move on:
- No gif-to-video conversion yet available from Sanity's API
- No mp4-to-webm conversion yet available from Sanity's API
- Need to use a separate component inside Sanity Studio to add a video animation in your block content
I can live with 3. above. My main issue of course is with the whole GIF and video converting part that is not yet as easy as the image converting capabilities of Sanity. I hope they will soon add this feature because it will be quite time-saving but most importantly it may push more people to adopt this approach and make the web faster and less data-hungry.
Video animations in Sanity + Gatsby#
For the implementation of this approach let's look at it as being a 3-part process:
- Create schema for the new video animation component in Sanity Studio
- Render the video coming from Sanity's API inside of Gatsby
- (optional) Lazy load the video animations in Gatsby
Note: By "video animation" in this article I mean a video that is viewed in the same way as a GIF animation - muted, in loop and with autoplay - but instead it has a video format, e.g.mp4,webm.
Right, so let's get right to it!
Step 1: Video schema in Sanity Studio#
Inside of our Sanity studio project under the studio/shemas/ directory (or wherever you keep your schemas) we will create a new file that will describe the new video animation schema:
videoAnimation.jsimport { MdVideoLibrary } from "react-icons/md";
export default {
name: 'videoAnimation',
title: 'Video animation',
type: 'object',
icon: MdVideoLibrary,
fields: [
{
name: 'webm',
title: 'WebM format',
type: 'file',
options: {
accept: 'video/webm'
}
},
{
name: 'fallback',
title: 'Fallback format',
type: 'file',
options: {
accept: 'video/mp4'
}
},
{
name: 'aspectratio',
title: 'Aspect Ratio',
type: 'number',
},
{
name: 'caption',
title: 'Caption',
type: 'string',
options: {
isHighlighted: true
}
},
{
name: 'alt',
title: 'Alternative text (for screen readers)',
type: 'string',
options: {
isHighlighted: true
}
}
]
}Best practise: The aspectratio field is optional for this article of course but it's a nice touch if you are interested in saving a few layout shifts for your users, especially (but not exclusively) if you are planning to add lazy loading.Optionally, if you would like to add a preview for your uploaded videos inside of Sanity Studio you can add these lines below:
videoAnimation.jsimport React from "react";
import { getFileAsset } from '@sanity/asset-utils';
import { Flex, Spinner } from "@sanity/ui";
const PROJECT_ID = process.env.SANITY_STUDIO_PROJECT_ID;
const DATASET = process.env.SANITY_STUDIO_DATASET;
const VideoPreview = props => {
if (props.isLoading || !props.value.video || !props.value.video.asset) {
return (
<Flex justify="center">
<Spinner muted />
</Flex>
)
}
const videoAsset = getFileAsset(props.value.video, {
projectId: PROJECT_ID,
dataset: DATASET
})
return (
<video loop muted autoPlay playsInline style={{ maxHeight: 350 }}>
<source src={videoAsset.url} type={`video/${videoAsset.extension}`} />
</video>
)
}
export default {
name: 'video',
title: 'Video animation',
type: 'object',
fields: [
// ...
{
name: 'fallback',
title: 'Fallback format',
type: 'file',
options: {
accept: 'video/mp4'
}
},
],
preview: {
select: {
video: 'fallback'
},
component: VideoPreview
}
}After creating the schema for our new video animation component don't forget to include it inside of the createSchema method along with all your other custom schemas:
schema.jsimport createSchema from 'part:@sanity/base/schema-creator'
import schemaTypes from 'all:part:@sanity/base/schema-type'
// import post from './post'
// import postAuthor from './postAuthor'
// ...other imports
import videoAnimation from './videoAnimation'
export default createSchema({
name: 'default',
types: schemaTypes.concat([
// post,
// postAuthor,
// ...other types
videoAnimation,
])
})Finally, include the videoAnimation type as an option to be included inside of your blog posts or any other content for that matter. In my case, I have added this as an option inside the blockContent component that I use to write articles:
blockContent.jsexport default {
title: 'Block Content',
name: 'blockContent',
type: 'array',
of: [
{
title: 'Block',
type: 'block',
// ...
},
{ type: 'image' },
{ type: 'videoAnimation' },
]
}Step 2: Rendering the video animation#
In this step, we will add some logic inside of Gatsby so that we render each video animation coming from Sanity's CMS.
First of all let's create a video animation component, that will take all of the above fields (webm, fallback, caption, alt, etc) as props inside of our Gatsby project:
VideoAnimation.jsimport React, { useEffect } from 'react'
import { getPaddingFromAspectRatio } from '../../lib/helpers';
import { videoAssetFor } from '../../lib/video-url'
const VideoAnimation = ({ webm, fallback, aspectratio, alt, caption }) => {
if (!webm || !fallback) {
return null
}
const webmAsset = videoAssetFor(webm)
const fallbackAsset = videoAssetFor(fallback)
return (
<figure
style={{ paddingTop: getPaddingFromAspectRatio(aspectratio) }}
>
<video
title={alt}
loop muted autoPlay playsInline>
<source src={webmAsset.url} type={`video/${webmAsset.extension}`} />
<source src={fallbackAsset.url} type={`video/${fallbackAsset.extension}`} />
</video>
<figcaption>{caption}</figcaption>
</figure>
)
}
export default VideoAnimationvideo-url.jsimport { getFileAsset } from '@sanity/asset-utils'
import sanityConfig from '../../../studio/sanity.json'
export function videoAssetFor (source) {
return getFileAsset(source, sanityConfig.api)
}Tip: If you are interested in the getPaddingFromAspectRatio util function, you can find the code and logic here.Then inside of your Sanity block content serializers, include this VideoAnimation component for each videoAnimation found inside Sanity block content:
import BaseBlockContent from '@sanity/block-content-to-react'
import React from 'react'

import VideoAnimation from './videoAnimation'

const serializers = {
//  marks: { ... },
  types: {
    block (props) {
      // ...
    },
    video (props) {
      return <VideoAnimation {...props.node} />
    }
  }
}

const BlockContent = ({ blocks }) =>
  <BaseBlockContent blocks={blocks} serializers={serializers} />

export default BlockContentStep 3: Lazy-loading the video animation#
Well, if you made it this far pat yourself on the back, I know it can be a tedious process with many things to go wrong.
This final part though should be the easiest and hassle free. To sum up the changes we need to do for the video lazy loading to work, let me list them below:
- Install the
lozadnpm package by running:npm i lozad - Initialise
lozadinside theuseEffecthook (lines 3-11) - Add the
lozadCSS class to the<video>html element (line 19) - Rename the
srcattributes todata-src(lines 21 and 22)
VideoAnimation.jsconst VideoAnimation = props => {
// ...
useEffect(() => {
const loadLozad = async () => {
const lozad = require('lozad')
const observer = lozad();
observer.observe();
}
loadLozad()
})
return (
<figure
style={{ paddingTop: getPaddingFromAspectRatio(aspectratio) }}
>
<video
title={alt}
className='lozad'
loop muted autoPlay playsInline>
<source data-src={webmAsset.url} type={`video/${webmAsset.extension}`} />
<source data-src={fallbackAsset.url} type={`video/${fallbackAsset.extension}`} />
</video>
</figure>
)
}And that's it! You should now serve hundreds of KBs less to your users and have a substantially faster website than before.
If you are stuck somewhere get in touch on LinkedIn or Twitter and see if I can help you somehow. For a live final product, just inspect this page 😀
Further reading#
- Lazy-loading video - web.dev
- Use video formats for animated content - web.dev
- Replace GIFs with video for faster page loads - web.dev