
Illustration by unDraw
Cache handling with Service Workers and the Cache API
Leveraging service workers and the powerful Cache API for creating fast and app-like experiences on the web.
In this article, I will be including various ways in which you can leverage the powerful Cache API on the web.
The Cache API allows developers to control cache memory with no sweat. This memory is not to be confused with the browser cache/memory cache nor the HTTP cache.
The Cache API allows HTTP Request caching which can be useful on almost any website out there.
Combined with the unique power that service workers unlock, it is possible to offer offline functionality on any website. Whether that is a static website or even a server-side-rendered app.
Let us then get on with how to implement caching in our web app by leveraging the Cache API and service workers.
I will be laying out similar implementations in both Vanilla JavaScript and Workbox. Vanilla JavaScript will give you more clarity but Workbox is recommended for avoiding mistakes and adding simplicity.
Note: For the following section, I am considering that you are familiar with JavaScript ES6, service workers, Workbox, and the Fetch API.
Service worker registration is also assumed to be already in place.
Pre-Caching#
There will be times when you would like to pre-cache some resources as soon as the user lands on your webpage and before the user requests them. This may include resources that will later be needed to follow user navigations or additional files to ensure offline capability.
Resources can actively be requested and saved to the cache from within the service worker.
Pre-Caching — Vanilla#
During pre-caching and caching in general, versioning is important and can prevent common confusions for you while developing but also for your users. We need to make sure that any older version of a resource is replaced by the newest one from the network.
If you wish, you could implement your own versioning system, however, for the sake of simplicity, I won’t go this far in this article.
Delete previous cache#
Instead, we will be purging the cache. Inside the service worker’s activate event, delete all previously cached files if necessary:
sw.jsaddEventListener('activate', event => {
event.waitUntil(
caches.keys().then(cacheNames => {
return Promise.all(
cacheNames.map(cacheName => caches.delete(cacheName))
);
})
);
})Note: Remember, before deleting, that the cache is shared between pages/routes of the same origin!
Adding files to the cache#
Thankfully, the Cache API makes adding files to the cache dead-easy. During the service worker install event, we just need to open the pre-cache cache and add all the files using the Cache’s addAll function.
sw.jsconst precacheName = 'precache-example-website';
const precacheFiles = [
'/css/main.min.css',
'/js/app.min.js',
'/offline.html'
];
addEventListener('install', event => {
event.waitUntil(
caches.open(precacheName)
.then(cache => cache.addAll(precacheFiles))
);
});The above example demonstrates how powerful the Cache API is.
The addAll function takes in an array of strings (resource URLs) and creates a Request object for each resource. Then, it fetches the resource before saving the completed request to the device’s memory. Pretty neat, ha?
After this code is run, the user would have the precacheFiles downloaded and saved on their device without even requesting them in the first place. The offline.html file will be available and shown when the user goes offline and so it is important that it is pre-cached.
Pre-Caching — Workbox#
Hopefully, after this demonstration, you will be pumped about using Workbox, if you are not already.
To pre-cache using Workbox in the simplest way, we just need to include the following line, anywhere inside our service worker JavaScript file.
sw.jsworkbox.precaching.precacheAndRoute(
['/', 'next-page-script.js', 'next-page-styles.css'],
'GET'
);For some true Web Dev Kung Fu, use the Workbox library tools to generate a pre-cache manifest which will contain all your files needed to be pre-cached, including their versions!
sw.jsworkbox.precaching.precacheAndRoute(
(self.__precacheManifest || [])
);You don’t need to worry about versioning, tracking revisions, and updating each of your files. You just need to include self.__precacheManifest like above and Workbox will take care of all that by updating only the files that have a new version.
Workbox is also taking care of cache naming and intercepting HTTP requests. Good stuff!
Tip: Get Workbox default pre-cachecacheNameand then thecacheObject like this:const cache = await caches.open(workbox.core.cacheNames.precache)
Runtime Caching — Vanilla#
Runtime caching is extremely useful for resources that are “out of your control”.
For example, third-party scripts that fetch resources from within them, e.g., Google Fonts will fetch the CSS which in return will fetch the latest version of the WOFF 2/TTF files for the fonts.
Here, it is important to understand why the service worker comes in handy for this task and why it is so powerful. The main reason is this:
The service worker acts as a “proxy” between your application and both the network and the cache.
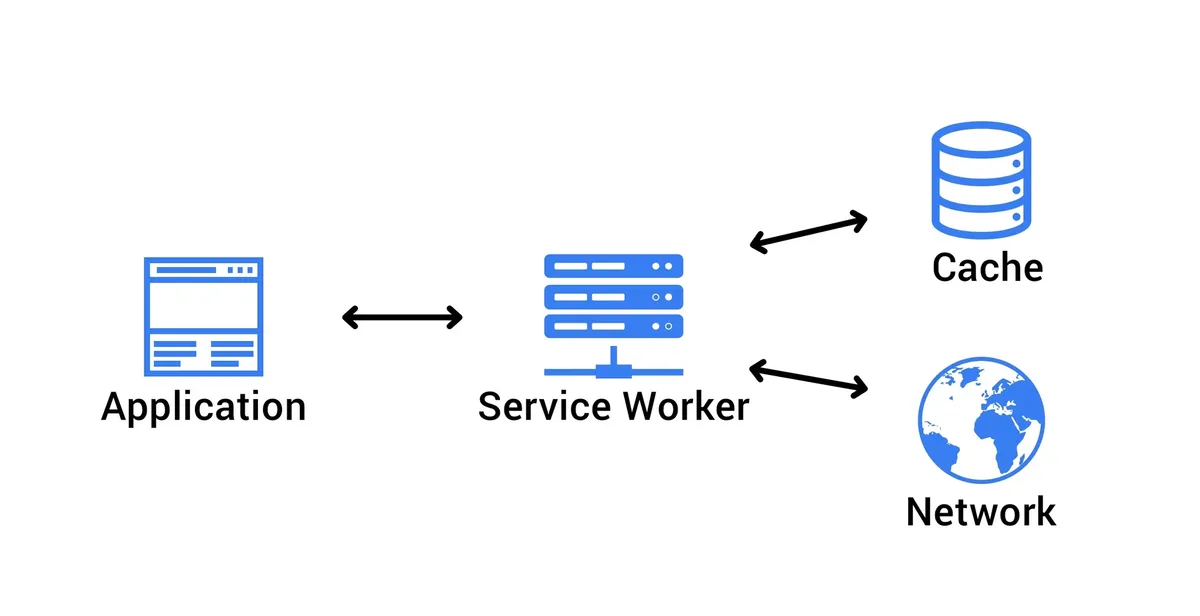
Because of the service worker’s powerful ability to intercept client’s HTTP requests, it gives us the superpower to add the following example functionality:
If a resource does not exist in the cache:
- Request it from the network.
- And add it to the cache for later use.
If a resource exists in the cache:
- Respond with cached resource.
Fetch from network and save response to cache#
For runtime caching in Vanilla JS, we will be using the Cache API and the fetch event inside the service worker’s thread:
sw.jsconst RUNTIME_CACHE = 'runtime-cache-example-website';
addEventListener('fetch', async event => {
const networkResponse = await fetch(event.request);
const runtimeCache = await caches.open(RUNTIME_CACHE);
runtimeCache.put(event.request.url, networkResponse);
});Respond from cache, otherwise fetch from network#
Then, we would like to check for the resource requested inside the cache and respond with that one instead, improving performance!
Adding the rest of the logic to respond to the client’s request accordingly, the final code will look something like the following:
sw.js// when the browser requests a resource
addEventListener('fetch', event => {
event.respondWith(
// look in the cache for the resource
caches.match(event.request).then(async response => {
if (response) {
// is in cache, respond with the cached resource
return response;
}
// if not found fetch it from the network
const networkResponse = await fetch(event.request);
// response needs to be cloned if going to be used more than once
const clonedResponse = networkResponse.clone();
// save response to runtime cache for later use
const runtimeCache = await caches.open('runtime-cache');
runtimeCache.put(event.request, networkResponse);
// respond with the cloned network response
return Promise.resolve(clonedResponse);
})
);
});Note the cloning of the Response object! Responses are supposed to be used only once so, because we are putting it into the cache and also returning it to the user, we will need to clone it first.Runtime Caching — Workbox#
To go further, we need to make sure you are feeling comfortable with Workbox’s strategies and know when to use each one of them.
If you are not feeling comfortable yet, I recommend spending three minutes going through my article on Workbox strategies first.
Using Workbox strategies#
Strategies are applied to specified HTTP routes. For this, Workbox provides a high-level interface through the registerRoute function.
This function allows for route handling by configuring specific strategies based on a route’s URL.
- Stale while revalidate example:
sw.jsworkbox.routing.registerRoute(
/\.(?:js|css|webp|png|svg)$/,
new workbox.strategies.StaleWhileRevalidate()
);The above single-line code is included in the service worker JavaScript file.
Here we are stating that for every request ending with any of these extensions js, css, webp, png, or svg, it should be handled by the StaleWhileRevalidate strategy.
When no strategy is specified, the default strategy is applied, which is CacheFirst.
- Network first example:
sw.jsworkbox.routing.registerRoute(
/(\/|\.html)$/,
new workbox.strategies.NetworkFirst()
);The above route registration is handy for server-side-rendered applications where it is important to show the most up-to-date version of the website and database, but still want to show at least something to the user when offline.
Default Offline Page#
Speaking of offline…

It goes without saying that a true PWA never shows the “downasaur” to the user!
Service workers allow us to play it safe on the web and make sure that our users are always seeing something, even when hitting a non-existent route or while offline.
4-step process#
- Listen for navigation type requests in the service worker’s
fetchevent. - Get the resource from the cache or from the network.
- Check for any network issues (example: 404 HTTP status).
- If a resource is not found in either place, respond with the cached offline page.
But first, we need to lay down the groundwork!
Pre-caching the offline page during the service worker’s install event makes certain that the offline page is in the device’s cache so we can always fall back safely to it.
sw.jsself.addEventListener('install', function(event) {
event.waitUntil(
caches.open(cacheName).then(cache => cache.add('/offline.html'))
);
});With Workbox, you should be generating a pre-cache manifest at build time that will contain the offline.html file.
Then, we can handle network errors inside the fetch event when the request is of navigation mode and respond with the appropriate resource, depending on the conditions.
sw.jsconst OFFLINE_PAGE_URL = './offline.html';
const staleWhileRevalidate = new workbox.strategies.StaleWhileRevalidate();
addEventListener('fetch', event => {
if (event.request.mode === 'navigate') {
event.respondWith((async () => {
const url = event.request.url;
try {
// check if the event.request.url exists in the cache or in the network
const response = await caches.match(event.request) ||
await fetch(event.request);
if (!response || response.status === 404) {
throw new Error(response.status);
} else {
return await staleWhileRevalidate.handle({event});
}
} catch (error) {
// if not found in any of the two, respond with the offline.html file
console.warn(`ServiceWorker: ${url} was not found either in the
network or the cache. Responding with offline page instead.\\n`);
return await caches.match(OFFLINE_PAGE_URL) ||
await fetch(OFFLINE_PAGE_URL, { method: 'GET' });
}
})());
}
});Now, go on and create a playful and smart offline page that your users will be too excited to leave!
Need inspiration? Example offline pages.

Further Reading#
- Cache API docs — MDN Docs
- Using the Cache API — Google Developers
- Generating a pre-cache manifest — Google Developers
- Marking and listing offline available pages in a PWA — Medium
- PWA Wiki website
If you would like to learn more about Workbox strategies check out my other article 'Loading...'.